In order to leverage on the OOTB usecases that are based on Windows SYSMON-PROCESS, SYSMON-NETWORK, SYSMON-FILE, SYSMON-IMAGE-LOAD, SYSMON-REGISTRY, SYSMON-WMI, SYSMON-PIPE, SYSMON-SERVICE and SYSMON-DNS, one must install this service on their Windows host. Failure to do so, will result in non functioning workbooks that have a prerequisite of installation of stated services.
System Monitor (Sysmon) is a Windows system service and device driver that, once installed on a system, remains resident across system reboots to monitor and log system activity to the Windows event log.
This document provides steps for integration with 32 bit and 64 bit Windows machines.
Include command line logging in process creation events
This policy setting determines what information is logged in security audit events when a new process has been created.
This setting only applies when the Audit Process Creation policy is enabled. If you enable this policy setting the command line information for every process will be logged in plain text in the security event log as part of the Audit Process Creation event 4688, "a new process has been created," on the workstations and servers on which this policy setting is applied.
Open the Local Group Policy Editor and navigate to Computer Configuration > Administrative Templates > System > Audit Process Creation and Enable the Include command line in process creation events policy.
For more information and latest updates, kindly refer the Windows OEM guide - Command Line Logging
Integration of Microsoft Sysmon Logs with DNIF
Install and Configure Windows Sysmon
Sysmon is a command-line tool; once downloaded from the Microsoft Sysinternals web site the installation is straightforward: Open elevated (“Run as Administrator”) command line and execute the following command:
$ Sysmon /?
-
Set up the tool with default configuration
-
Define the desired configuration directly from the command line or from a configuration file https://github.com/SwiftOnSecurity/sysmon-config
-
Move the zip file to the C:\ drive and unzip the same.
-
Now a new folder gets created with the name Sysmon.
-
Download the configuration file for Sysmon - Download XML File.
-
Move the XML file within the folder C:\Sysmon.
-
Edit the XML file to include the Rules for Sysmon EventID 7, add the following lines as mentioned below:
<!-- Event ID 7 == Image Loaded. Log everything except -->
<ImageLoad onmatch="exclude">
   <Image condition="image">Sysmon.exe</Image>
   <Image condition="image">nxlog.exe</Image>
</ImageLoad>
Reference
-
Save the xml file.
-
Open ‘Command Prompt’ with administrator privileges.
-
Navigate to the folder C:\Sysmon.
-
Execute the following command,
- If you have 64 bit Windows:
$ Sysmon64.exe -accepteula -i -n -l -r
$ Sysmon64.exe -c sysmonconfig-export.xml
- If you have 32bit Windows:
$ Sysmon.exe -accepteula -i -n -l -r
$ Sysmon.exe -c sysmonconfig-export.xml
- To apply the changes, you have to restart the service:
- Go to Control Panel > Services and locate the Sysmon64 service for 64bit Windows or locate Sysmon service for 32bit Windows accordingly.
- Right click on Sysmon or Sysmon64 accordingly and click on restart.
Download and Install Nxlog
Download and install the latest version of NXLog on the Windows machine from which the logs need to be collected.
After installation, locate the nxlog.conf file in the C:\Program Files (x86)\nxlog\conf folder.
In 32 bit Windows machines, look in the C:\Program Files\nxlog\conf folder,
- Open the nxlog.conf file using a text editor. Replace the entire configuration by copy-pasting the text given for your Windows version.
Windows x32 bit OS
#============ Define ROOT here ===================
define ROOT C:\Program Files\nxlog
#define ROOT C:\Program Files (x86)\nxlog
#============ NXLog Machine Log info =============
Moduledir %ROOT%\modules
CacheDir %ROOT%\data
Pidfile %ROOT%\data\nxlog.pid
SpoolDir %ROOT%\data
LogFile %ROOT%\data\nxlog.log

#############For Sysmon and windows event logs###############

<Extension _json>
Module xm_json
</Extension>

<Input in>
Module im_msvistalog
Query <QueryList> \
<Query Id="0"> \
<Select Path="Microsoft-Windows-Sysmon/Operational">*</Select> \
<Select Path="Application">*</Select> \
<Select Path="System">*</Select> \
<Select Path="Security">*</Select> \
</Query> \
</QueryList>
</Input>

<Output out>
Module om_udp
Host DNIF-Adapter-IP
Port 514
Exec to_json();
</Output>

<Route 1>
Path in => out
</Route>
Windows x64 bit OS
#============ Define ROOT here ===================
#define ROOT C:\Program Files\nxlog
define ROOT C:\Program Files (x86)\nxlog
#============ NXLog Machine Log info =============
Moduledir %ROOT%\modules
CacheDir %ROOT%\data
Pidfile %ROOT%\data\nxlog.pid
SpoolDir %ROOT%\data
LogFile %ROOT%\data\nxlog.log

#############For Sysmon and windows event logs###############

<Extension _json>
Module xm_json
</Extension>

<Input in>
Module im_msvistalog
Query <QueryList> \
<Query Id="0"> \
<Select Path="Microsoft-Windows-Sysmon/Operational">*</Select> \
<Select Path="Application">*</Select> \
<Select Path="System">*</Select> \
<Select Path="Security">*</Select> \
</Query> \
</QueryList>
</Input>

<Output out>
Module om_udp
Host DNIF-Adapter-IP
Port 514
Exec to_json();
</Output>

<Route 1>
Path in => out
</Route>
- Restart NXLog
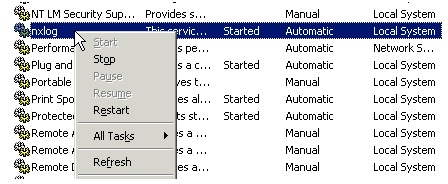
- To apply changes made on nxlog.conf, you have to restart the service again. Go to Control Panel > Services and locate the nxlog service.
Right click on nxlog and restart
Microsoft Sysmon logs are now streamed to DNIF.
