DNIF provides users with the flexibility to create custom extractors. These custom extractors can be completely new or created by cloning or modifying existing native extractors. This allows users to parse certain log events or additional fields not captured by the native extractors. It is recommended to consult your administrator when creating custom extractors.
To write Custom extractors in DNIF, you can choose from the following methods:
- DNIF AI-Assisted Extractor Generator: leverages generative artificial intelligence to automatically generate extractors from provided log samples.
- Manual Method: helps to manually create new extractors using the “Extraction” interface
- Cloning Method: helps in duplicating or modifying an existing native extractor
Also, the extractor validator is a valuable feature that assists users in writing more effective extractors by providing immediate feedback and helping them avoid errors.
DNIF AI
The Extractor Generator assists the security analyst in auto-generating a custom extractor using the power of generative artificial intelligence. By analyzing the structure and content of the provided log samples. DNIF AI suggests a starting point for your extractors, effectively reducing the effort and complexity involved in manual creation. Click here to learn more about it.
Manual Method
To customize extractors manually through the designated interface, follow these steps:
- Navigate to the extractor page and click on the plus icon “+” to create a custom extractor.
- Select "Manual" from the options provided, as illustrated in the image below.

- A new window will open as shown below, Enter a Name for the extractor you are about to create, and you can directly start writing in the yaml editor.
- Paste your Log samples in the below log samples section.
- Click Submit after writing the parser
- It will start validating the extractor and show errors if any. Check for the Extractor validation here.
- If any of the checks fail, the extractor is saved in draft mode.
- If all checks pass, the extractor gets published and is enabled by default.
The customized extractor will then appear in the list on the extractor listing page.
Cloning Method
In this method, you have the option to create a custom extractor by duplicating an existing native extractor.
- To initiate this process, click on the name of the desired native extractor from the list.

- The current extractor listing page will appear, allowing you to modify the existing extractor according to your needs.
- After making the necessary changes, click "Submit" at the bottom of the page to save your modifications.
- A popup window will appear next., it will allow you to Disable the existing extractor, Click "Save" to finalize the creation of your custom extractor.
Note: The existing extractor will always be disabled by default to ensure that only one extractor is active at any given time. If a user attempts to enable both simultaneously, an error message will be displayed. - The New Cloned Extractor will open in edit mode and the validation process will begin.(For Extractor validation click here.)
- If any of the checks fail, the extractor is saved in draft mode.
- If the extractor goes through all the checks, the extractor gets published and is enabled by default.
How to write an extractor using a yaml file?
Extractors are built-in .yaml files, the value for ExtractorID, SourceName, and SourceType is populated along with the assigned key value.
Basic Information
Each extractor will have the following basic information
| Field | Description |
| schema-version | The version assigned to the extractor. |
| extractor-id | The unique ID assigned to the extractor is autogenerated and does not need to be specified in the yaml file. |
| source-name | The name assigned to the extractor as per the device. Example: Fortigate, Checkpoint, etc |
| source-type | The type of device.Example
|
| source-description | A short description regarding the extractor |
Stream
Stream is a domain-specific collection of data from different sources that contributes to a unique dataset and a unique set of use-cases. Each value in the Stream field within the extractor can be used to generate a search that returns a particular dataset with information.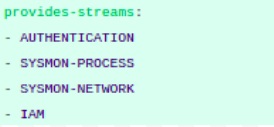
This is the section where we could define the streams that are included in the extractor. There are various streams such as: AUTHENTICATION, SYSMON-PROCESS, SYSMON-NETWORK, IAM etc
Example: Authentication refers to the login and logout activity events, IAM refers to the User Management events such as create user, delete user.
Master Filters
The Master Filters and First Matches help to identify the extractor to be applied to a given log source, it has been heavily optimized for performance.
Event Details:
The following configuration should be done under Event details
-
First Match
First Matches will help us identify different patterns associated with a log source.- Each first match will be associated with a decoder.
- First matches can now yield multiple events if used with decoder=json or custom-kv.
-
Decoder
Decoder section defines the type of decoder to be used on the basis of the log format. Decoders are defined at the First match level, therefore, we could use multiple decoders in an extractor file.
There are 3 decoders available-
JSON: It is written as ‘decoder: json’ in the extractor files. The log samples which are in JSON format could be parsed using this decoder. It parses all the key-values correctly that are rendered in the log sample.
Note: Regex is not required to parse key values. -
Custom(key-value): It is written as ‘decoder: custom’ in the extractor files. The log samples which are in key-value format could be parsed using this decoder. Here, we have to write a generic regex that captures the key and value from the log samples appropriately.
Example: Refer to the below snapshot: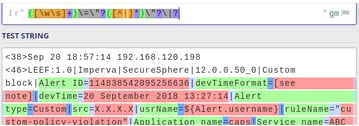
-
As per the snapshot, it is seen that a generic regex is written to capture the key value in the log sample. This regex will result in groups of keys and values, displayed in the image below. Further, the Key could be annotated as per the field Annotations in the extractor.
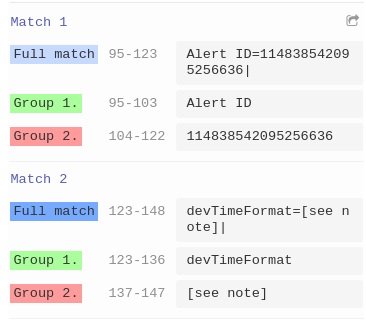
-
Regex: It is written as ‘decoder: regex’ in the yml files. The log samples that are in Syslog (only values) format could be parsed using this decoder. Here, we have to write the regex and define the field name in it. This field name could be mapped and annotated in the extractor accordingly.
Example: Refer to the below snapshot
In the snapshot, it can be seen that field names are defined in the regex. This could be achieved by writing (?P<field_name>) at the start of the group.
-
-
Event Key Format
In the event-key-format section we have to define the field on the basis of which we could achieve an accurate present in the log event.
For example: Refer to the snapshot below:
-
In the snapshot above one can see that First Match is defined on the basis of SourceName and further it is segregated on the basis of EventID in the ‘event-key-format’ section.
-
Event Key Mapping:
In the ‘event-key-mapping’ section the events could be defined with appropriate Streams. Although while specifying an event in this section one needs to ensure each event identifies itself with a Stream.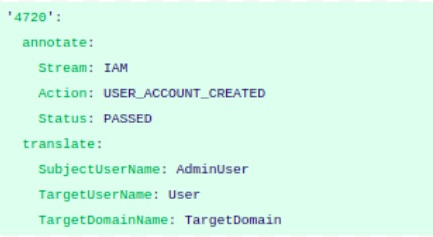
In the snapshot, EventID is defined as the pointer that provides us maximum information about the log event. Refer to the below table to understand regarding annotate and translate fields.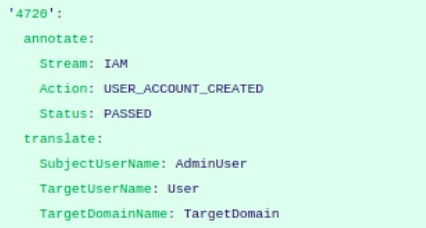
| Field | Description |
| annotate | Static key value for Stream, Action and status to be added as per the log event’s information. In the above snapshot, relevant Stream, Action and Status is defined as per the log event’s information.
|
| translate | All the relevant fields as per the stream should be defined under the translate section. Allows you to replace the fields as per DNIF terminology. |
- Fallback:
Fallback is a mandatory field. All the events that are defined with Stream will be parsed accurately, while the undefined events for that particular First Match will parse under the fallback section.
Example: Let us consider we have created the First Match on the basis of SourceName for Windows Extractor and the further division is on the basis of EventID. In this we have defined some EventIDs with proper stream while some of the EventIDs could not be defined, this undefined EventID will then parse under the fallback section.
Refer the snapshot for fallback events field definition: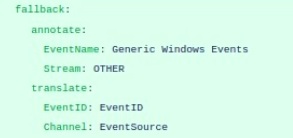
- Globals
Globals is a non-mandatory field. In this section we could define the generic fields that are present throughout the Extractor.
Refer the snapshot for globals definition: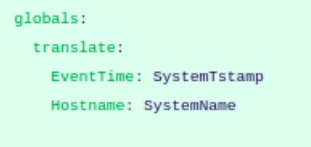
- Substitutions
In most of the devices, there are substitutions provided for some fields. This substitution can be defined under the globals section as follows: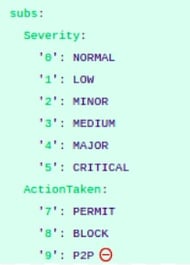
To make this work for multiple samples (First Matches) in the Extractor, following procedures can be followed.
For example: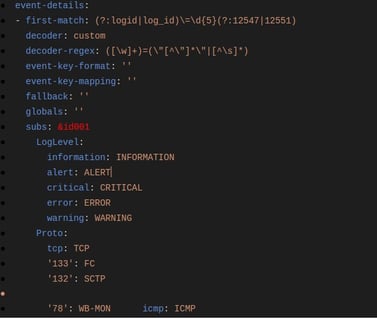

We have two first matches here.
Referring to the first occurrence of First Match, we have subs defined for it. The only addition being (&id001) present against subs. The character ‘&’ denotes assigning value of subs to the variable id001. Once we assign this to a variable, we can reuse it wherever we are using the same values, as in case of subs. (& sign is placed before variable name as assignment)
Referring to the second occurrence of First Match, we have subs but now we are only using (id001). So we are basically reusing the subs defined before. The symbol ‘’ is used with id001 to refer (&id001).
For all other occurrences of subs further, we can simply refer to the first occurrence of subs. We just need to make sure that assigning value to a variable has to be done at first occurrence of subs and then used later with its reference. And basic variable naming should be considered (alphabets/alphanumeric would be preferred.)
Pitfalls to avoid in a new way of building parsers
The procedure for creating an extractor has been mentioned in detail. If any of the steps are not followed correctly, it would result in bad extractor performance on the setup, this could also affect the EPS hits.
